MR-24 Roof System Gable Trim; Highest Performing Standing Seam Roof System on the Market Today
The MR-24 Gable Trim is a uniquely designed detail that sets the MR-24 roof system apart from its competitors. In fact, the MR-24 Roof System is the highest performing standing seam roof system on the market today because of its uniquely designed details and components such as its gable trim.
Unlike most gable or rake trim details, the MR-24 roof utilizes a two-piece system consisting of a top trim piece (the “gable trim”) that is fully seamed into the roof panel and a bottom trim piece (the “wall adapter”) that attaches to the wall system. Depending on the wall system that the trim is attached to the dimension of the wall adapter will vary.
The wall adapter and gable trim come together in a slip joint that allows the MR-24 Gable Trim Assembly to travel with the roof panels during thermal expansion and contraction conditions (Figure 1).
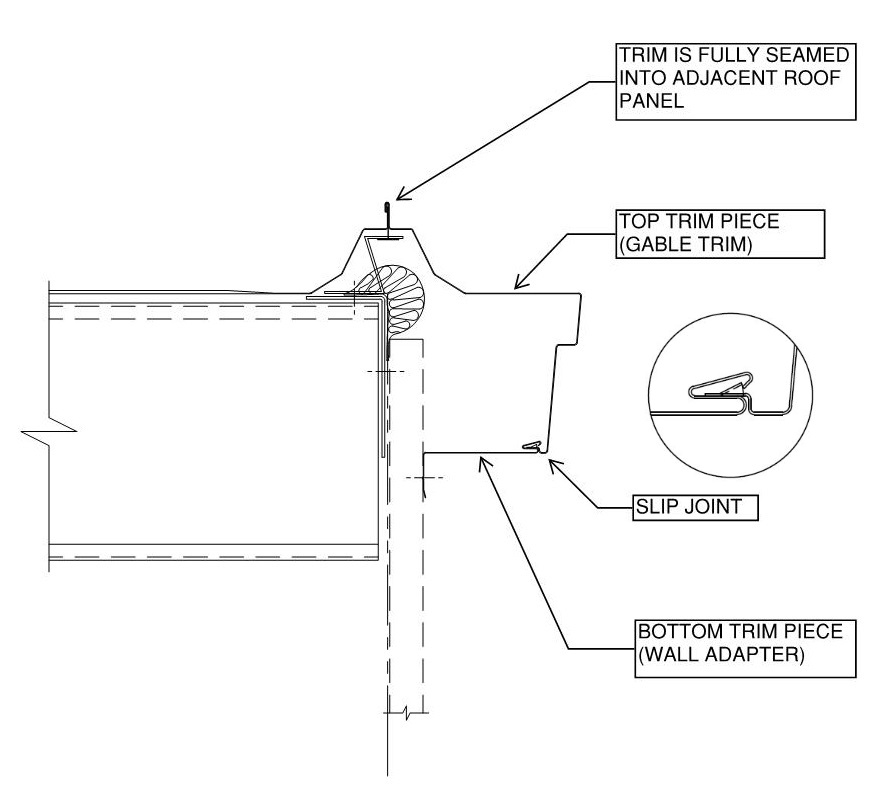
Figure 1: MR-24 Gable Trim Assembly
While this unique design provides exceptional weather-tight performance, it can be a bit daunting when repairing or replacing damaged gable trim. If you are not careful, you can easily underestimate the amount of time needed to repair the gable trim and quickly find your labor cost on a project exceeding what was originally budgeted.
Before you Start: What Wall Adapter Do You Need?
When repairing or replacing gable trim for the MR-24 Roof System, the first question that needs to be answered is what wall adapter do you need for your specific project? The easiest way to answer this question is to measure the length of the return leg on the existing wall adapter on your building’s gable trim. Then, take pictures of the entire gable trim assembly and the wall system on your project. You can email this information to your Butler Parts Online sales representative and we can help you determine which wall adapter to use on your project.
However, in some cases, you will not be able to measure the length of the return leg on the existing wall adapter. You may also have a problem measuring the return leg if the trim is installed on a non-Butler wall panel or on a block or concrete hard-wall. In either case, you can order Butler’s Variable Wall Adapter and field break the trim to fit your project’s conditions (Figure 2).
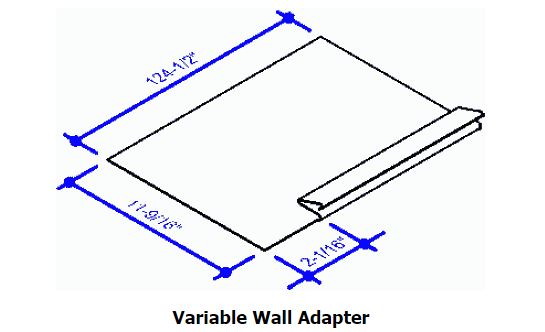
Figure 2: Variable Wall Adapter
After determining the appropriate wall adapter to use on your project, you need to move on to the gable trim piece. In most cases, the MR-24 panels that the gable trim is seamed into are in good condition and do not have to be replaced. It is at this point that some people start to remove the gable trim by cutting at the seam. DO NOT DO THIS!
When cutting out the old gable trim, leave the first face of the trim intact and cut at the second bend of the gable trim (Figure 3). This ensures that there is enough material left in place to connect the new gable trim to the roof using the MR-24 repair cap without compromising the integrity of the roof panel clip connections.
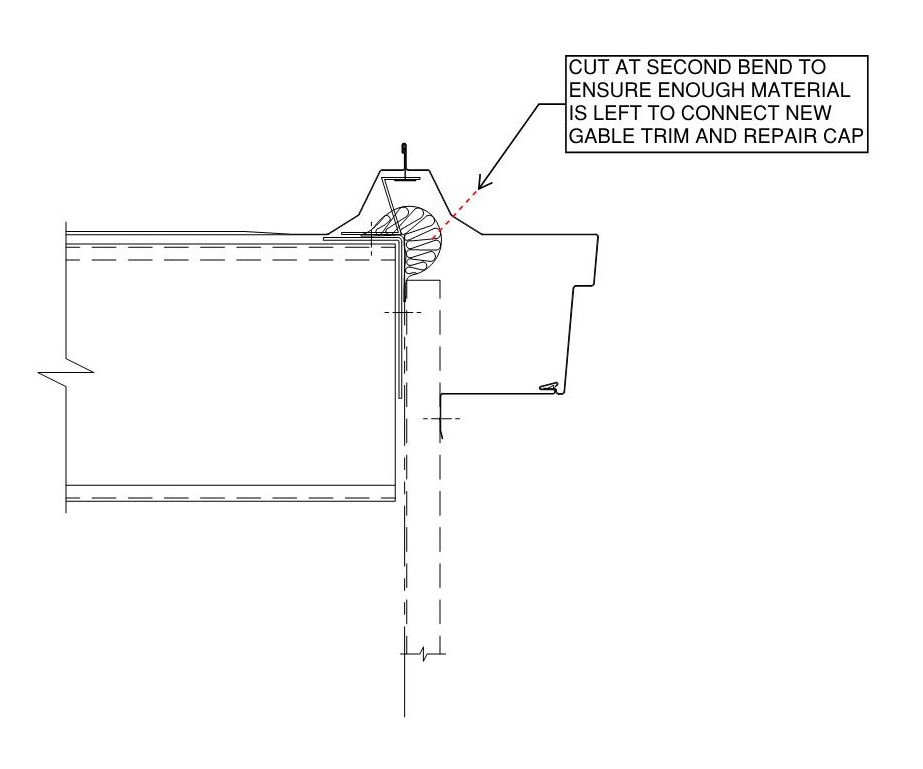
Figure 3: Gable Trim Cutting Detail
After taking down the old gable trim assembly, attach the new wall adapter to the face of the wall using appropriate fasteners for the wall material. It helps to strike a chalk line on the face of the wall five inches down from the bottom of the MR-24 panel, as a point of reference (Figure 4).
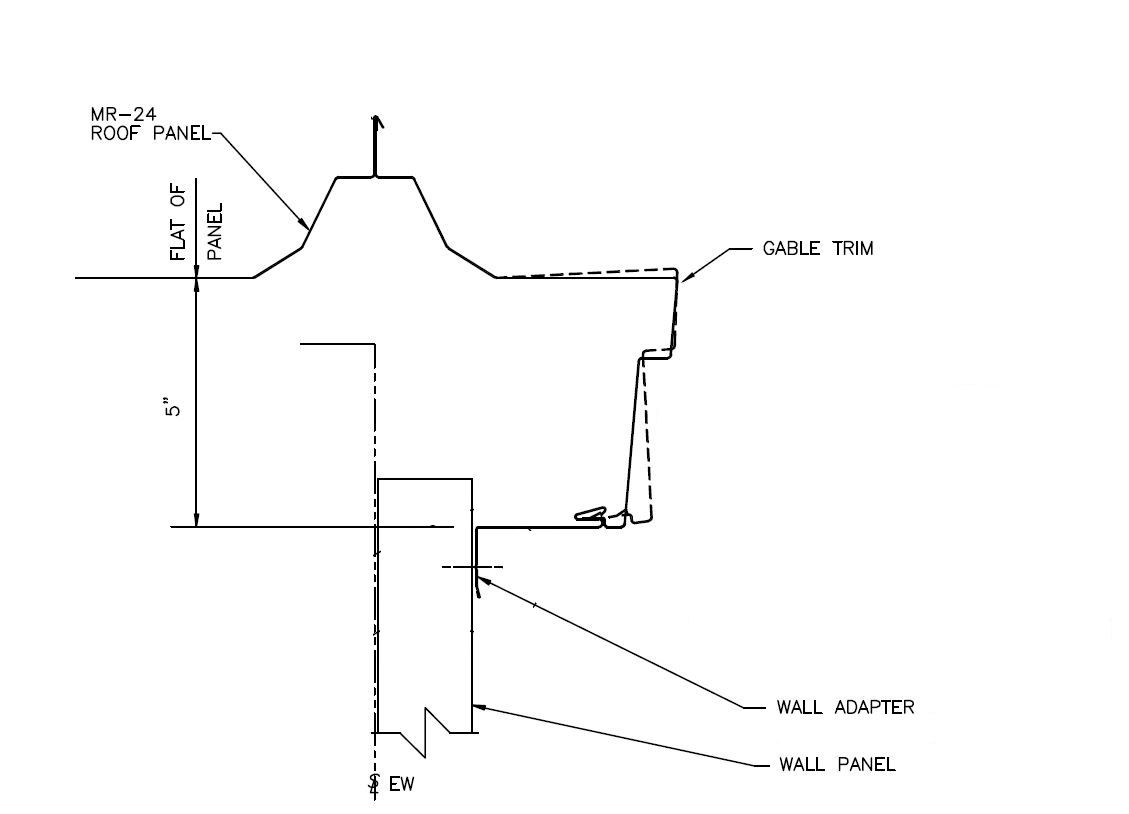
Figure 4: Locating The Wall Adapter
Liberally apply the Panlastic sealant at the bottom of the existing roof panel seam and at any trim overlaps. Snap in the bottom leg of the gable trim piece into the pocket of the wall adapter using hand pressure, and then carefully bend and hand crimp the seamed leg of the new gable trim piece over the top of the existing MR-24 seam.
Last but Not Least: Install the MR-24 Roof System Repair Caps
The final step in the repair process is to install the MR-24 repair caps to ensure a weather-tight seal. Start this process at the low eave end of the building. Using the holes in the repair cap as a template, layout and drill 5/16” holes through both the new gable trim and the old “flap” of material from the old gable trim for lock rivets. Take care to keep holes at least 6” away from the MR-24 clips.
Remove the repair cap and apply the gray sealant (#0016688) to the inside perimeter of the repair cap. Next, replace the repair cap and install lock rivets in each of the holes except for the last two holes on the upslope side of the repair cap (Figure 5). These two holes will be used as an overlapping point for the following repair cap where you repeat the process until the entire length of the seam is encapsulated with MR-24 repair caps.
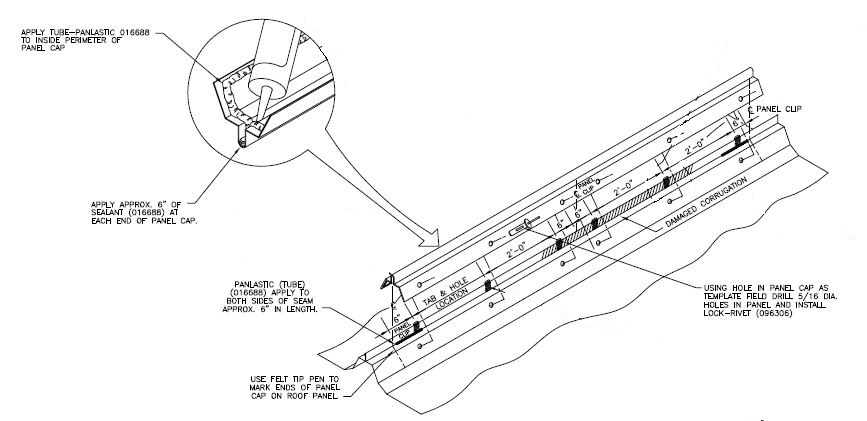
Figure 5: Repair Cap Installation
MR-24 Gable Trim Repair Process: Well Worth the Effort
This repair process, although tedious, ensures that a weather-tight seal is maintained at the edge of the roof and should provide years of trouble-free performance. Hopefully, this article has given you the knowledge and skills to accurately price and correctly repair the MR-24 gable trim system and it will help keep you and your customers satisfied with your Butler Building for years to come. If you need any questions answered or if you would like to receive a quote, please contact us today!